BIOL 121: F20-S21 MANUAL
  • Home
  • About
  • Unit 1
    • Lab 1
    • Lab 2
    • Lab 3
    • Lab 4
    • Lab 5 ONLINE ONLY
  • Unit 2
    • Lab 6 Part 1 OnLine
    • Lab 6 Part 2
    • Lab 7
    • Lab 8
  • Unit 3
    • Lab 10
    • Lab 11
    • Lab 12 Online
  • Library
  • WKU Blackboard

[Cells]
The Public Health Epidemic of Diabetes

Lab 2: The Role of Food

​Lab 2: Pre-Lab

 
Your task in Lab 2 will be to construct your own experimental protocol to predict the glycemic index of unknown food items, based on their molecular make-up, using chemical indicators. You may also have some time to continue the analysis you began in Lab 1.
  • Introduction
  • Do you know enough?
  • What will we do in lab?
  • LABridge
<
>

What is a macromolecule and how can you test for its presence in food?

A marcomolecule (or polymer) is a very large molecule comprised of smaller subunits (or monomers). We tend to recognize four primary types which are highly diverse in atomic make-up and structure and thus,  function. We will focus on the first three (carbs, lipids and proteins) in this lab. You should know the basic subunits of each, their shape, general function and a few examples. You need a basic understanding of dehydration synthesis & hydrolysis (or condensation reactions) which build and breakdown macromolecules. You also need to know which chemical test can be used to indicate each specific macromolecule.
Picture

​Please review THIS VIDEO on condensation reactions (<2m).

Picture

​Please review the slideshow. It provides an overview of macromolecules, the chemical indicators than can detect each in solution, and the affect of each macromolecule on the glycemic index score (an important dietary consideration for diabetics).

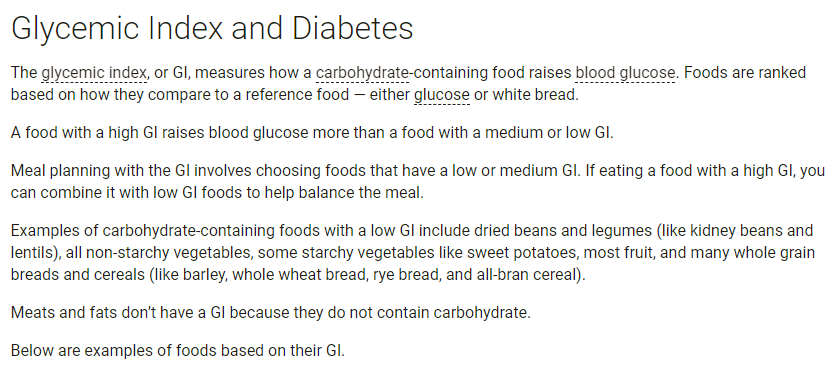
What is the glycemic index?

Remember...diabetes is a disease that occurs when blood glucose (i.e., blood sugar) is elevated because the body isn't making enough insulin or doesn’t use insulin well. The glucose then builds up in the blood, and doesn’t reach the cells where it is needed as an energy source. Over time, having too much blood glucose causes the serious and chronic health problems associated with diabetes.
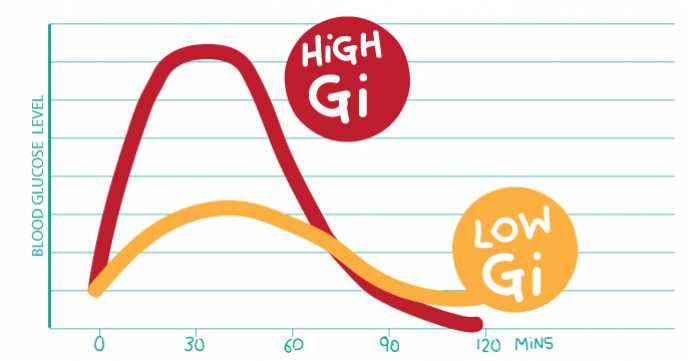
Because the blood glucose levels (BGLs) in diabetics are not well regulated, their diet becomes much more important. Primarily, diabetics have to be concerned with the frequency and types of carbohydrates they consume. Carbohydrates can be identified by their glycemic index (GI), which is a measure of how quickly the carbohydrate is broken down into its component parts to be used by the body. 
  • Most simple monosaccharides and disaccharides, like glucose and fructose, are quickly broken down, rapidly increase blood sugar, have high GI scores and are especially detrimental to diabetics.
  • Larger, more completed polysaccharides take longer to be broken down, slowly increase blood sugar, have lower GI scores and better for diabetics.
Picture
The affect of high vs. low GI foods on BGL over time.
However, keep in mind, diabetics don't just manage their diets based on the GI. They must also select foods that maintain their cholesterol and triglycerides levels, blood pressure, and weight management.
Picture

​Please read this quick explanation of the GI from the American Diabetes Association.

What will we do in lab and how will we do it?

2) Predict the GI score of 4 unknown food items: In the lab you will be provided with
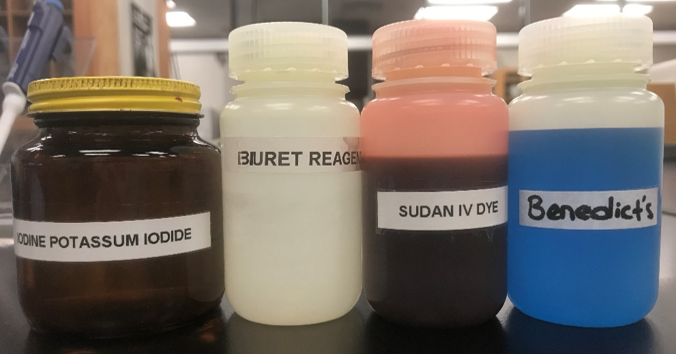
  • 3 chemical indicators that, when added to a sample, will "indicate" the molecular contents (mono/disaccharide, polysaccharide, lipid and protein content). 
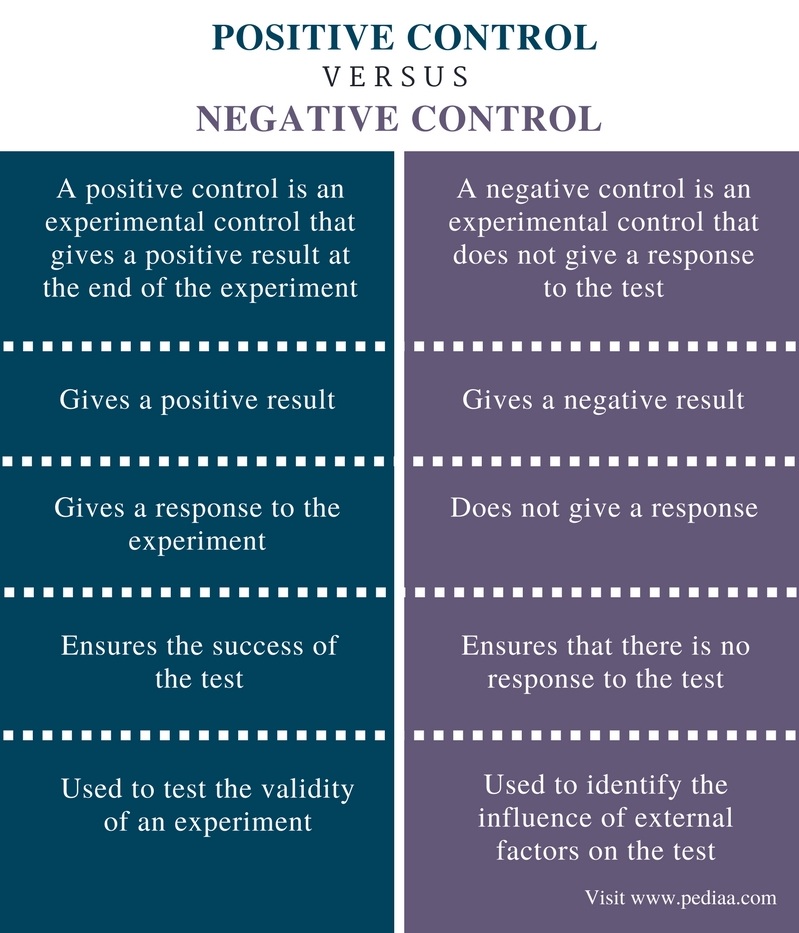
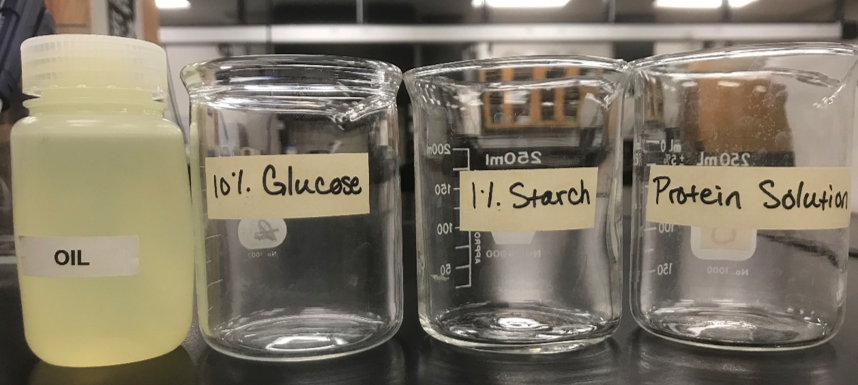
  • A series of known positive controls for each macromolecule.
  • Water to use as a negative control.
  • 4 unknown food samples.
  • Common glassware and equipment.
To complete the lab in our 1-hour timeframe, each lab bench will test for 1 different macromolecule. 
You develop a protocol using the above materials, that might help you predict the GI score for each of the unknown food items. Lastly, you'll compare your predictions to the actual GI scores.
Picture

​Learn about lab glassware and review the metric system as needed. Make sure you understand WHY scientists use the metric system. 

Picture

Review the importance of a positive and negative control.

Picture
​If you feel confident with this material, click the bridge icon and navigate to Blackboard to take the LABridge for Lab 1 & 2. Be ready to tested on this Pre-Lab material and make sure you have your Lab Notebook Guide from Lab 1 ready to submit.

Picture
Click here to get to WKU's blackboard to take your LABridge for this week. Be sure your Notebook Entry from last lab is ready to submit!

Lab 2: Protocol

In today's lab you will learn how to use a micropipette. You will set up experiments to try and predict the glycemic index of unknown food items and, if time allows, you can continue analysis of the diabetes data.

​Exercise I
. Accuracy, Precision & the Pipette
Exercise II. Chemical Indicator Tests
​Exercise III.
Predict the Glycemic Index
​
Picture
Lab Objectives: Following today's lab, you should be able to...
  • Exercise I
  • Exercise II
  • Exercise III: Post Lab
<
>

Exercise I. Accuracy, Precision & the Pipette 

Procedure​: Your task is to read over this material and get comfortable with your pipette. Before moving on to Exercise II, review with your instructor.
Please keep the following in mind to increase the likelihood of both accurate and precise measurements in lab:
  • Always record the measured value of a liquid at the bottom of the meniscus: the concave or convex surface of a liquid due to cohesion
  • You should always use the smallest possible vessel for your measurements. For example, if you need to measure 25mL of solution, you would use 50mL flask, not a 125mL or 250mL.
  • When transferring small volumes, you will usually use a micropipette. Occasionally you may be asked to use “drops” from a dropper bottle instead. 
  • For liquids: Graduated cylinders are best, second are flasks, never use beakers.
One of our most useful measuring tools is the micropipette, which you will need to use today in Exercise II. However, if this instrument is not used correctly is it neither accurate nor precise, and can be easily damaged. 
Review the parts of a micropipette:
  1. The Plunger & Volume Dial: If you SLOWLY push the plunger down, you will feel resistance. This is the first stop designed for drawing up fluids. If you continue to push the plunger, you will reach the end or second stop designed to expel fluid. If you draw fluid using the second stop, it will over-draw and your experiment will be compromised. The dial serves as volume adjustment dial. SLOWLY turn the dial to set the volume. DO NOT set a pipette past its listed capacity.
  2. Tip Ejector Button: SLOWLY push to eject a tip into the Bio-hazard container.
  3. Volume Indicator: Pipettes are labeled with their capacity. 1 - 5mL for larger volumes and 100-1000uL for smaller volumes. 
  4. Tips: Disposable tips are provided. Attach a tip by GENTLY pushing the pipette into tip and removing the tip from the box. As part of aseptic technique (methods used to prevent contamination), it is standard practice to dispose of each tips after each transfer and to keep the lid box closed at all times. 
Picture
At the beginning of lab, your instructor will demonstrate how to properly use a micropipette. Watch carefully and follow along. 

Exercise II. What's it made of? Can you use chemical indicators to identify the molecular components in unknown food items?

Your task in Exercise II is to conduct a series of tests, using chemical indicators, to predict the glycemic index score of unknown food items. ​
Picture
Equipment @ your station.
Materials: Your Tool Kit
  • Chemical indicators. For a review, use the tabs in the side bar. Each lab bench will have a different indicator.
  • Four solutions that will test positive for each indicator: glucose (positive on Bendict's Test), starch (positive on the Iodine Test), oil (positive on the Sudan IV Test), and egg albumin (positive on the Biuret Test). These four solutions should serve as your positive control for each test.
  • Distilled water which should serve as your negative control for each test
  • ​You will have 4 unknown food items for testing.
  • Lab supplies including: test tube clamps, test tubes, sample containers, hot water bath, beakers, test tube racks, stirring rods, graduated cylinders and micropipettes
  • Review common lab equipment.
Procedure​
  1. Review your group contract and roles for Lab 2. 
  2. If anyone in your group feels uncertain about the concepts of macromolecules, chemical indicators or the GI, please review the pre-lab together until everyone feels confident. If you notice a lab mate falling behind, encourage them to spend more time in preparation for labs in the future. 
  3. Typically each group would preform all the chemical indicator tests on many unknown food items. To meet the needs of our shortened lab time, each lab bench will focus on a particular test:
  4. Lab Bench 1: You will be testing our food items for protein.
    Lab Bench 2: You will be testing our food items for complex carbohydrates.
    Lab Bench 3: You will be testing our food items for simple carbohydrates.​
  5. Identify the chemical indicators you will use. Pay particular attention to one at your Lab Bench, but you should learn them all. ​ *******SPECIAL NOTE: All of these tests are time-sensitive and should be read following the strict protocols in the side bar. A bright yellow/orange result on a Biuret test is common if you wait too long to read it; it is still a NEGATIVE result and is related to pH. A dark brown test result with Benedict's means it might have stayed in the water bath for too long but is a POSITIVE result. *******
  6. Identify the positive (C+) controls needed for each molecular test. Pay particular attention to one you need at your Lab Bench, but you should learn them all. You should see beakers labeled as:​
    1. Lab Bench 1: egg albumin (C+ for protein... so it's the C+ for which indicator?)
    2. Lab Bench 2: starch (C+ for polysaccharides... so it's the C+ for which indicator?)
    3. Lab Bench 3: glucose (C+ for monosaccharides... so it's the C+ for which indicator?) 
  7. Identify your beaker of distilled water to serve as the negative control (C-).
  8. Collect the four unknown samples using the vials provided in each group’s tub. 
  9. Download and follow the Lab 2 Notebook Guide from the sidebar.
  10. As you begin to design your experiment, refer to the protocols for each indicator in the sidebar.  The protocol will explain exactly how the indicator works and what the testing procedure is. 
  11. Work through the first four steps in your lab notebook guide. Stop to get approval before beginning your tests. Step 1 and 2 have been completed for you.
  12. Once you have designed your procedure move on to designing your data table. Here's an example.
  13. Get approval from your instructor to proceed with your tests as designed. Be sure notes are taken and data are recorded throughout. Also, take photos as you move through for reference. 
  14. Once you have tested your unknown food samples, and completed your data table, provide your results in the class data table. This will either be on the board or in Excel on the presentation screen. ​
Picture
Lab 2 Notebook Guide. Click to download.

Indicator Protocols

Biuret solution
lugol's iodine
benedict's
Picture
Data table example for individual test results.

Exercise III. Would it be good for a diabetic? Can you predict the GI score of a food based on its molecular composition?

  1. If you're not confident with the  Glycemic Index (GI), review the  "Do you know enough?" section of our Pre-Lab.
  2. Use your test results for each unknown item to predict what the Glycemic Index score might be, step 5 in lab notebook guide.
  3. You should decide on a single number, and a range, and order the unknowns from highest to lowest predicted GI score. Don't forget about the link between GI score and blood glucose levels!
  4. Once complete, ask your instructor to provide you with the key, which will give you the name and GI score for each food item.
  5. Complete your lab notebook guide.
  6. Ensure all members have an electronic copy for reference and be ready to upload the your Lab 2 Notebook Entry  in the LABridge before we meet again next week.​
Picture
Picture

Lab 2 BIOL 120 CONNECTIONS
Section 2.5: Life is Carbon Based
​Chapter 3: Proteins
Chapter 5: Carbohydrates
Section 6.1: Lipid Structure & Function

Big Picture 2: The Chemistry of Life
BioSkills 1: Using the Metric System
​Bioskills 14: Reading Chemical Structures

Faculty Spotlight: Dr. Sigrid Jacobshagen

Picture
Email: [email protected]
Dr. Jacobshagen is extremely interested in clocks; not the kind hanging on the wall or on your phone, but biological clocks and circadian rhythms. She explores these internal physiological regulators, like the sleep/wake cycle, using algae as a model organism. Projects in her lab center on particular types of macromolecules called, photoreceptor proteins that are able to reset these circadian clocks. She is an accomplished researcher in the field of biochemistry and teaches our BioChem courses. She is also heavily involved with the Biochemisty Major. Reach out to her if you found Lab 2 particularity interesting or if you're still trying to decide what track you'd like to pursue in our department. 
Research Key Words: Circadian clocks, photoreceptor proteins, gene regulation and mathematical modeling
​Recent Publication:  Chlamydomonas reinhardtii strain CC-124 is highly sensitive to blue light in addition to green and red light in resetting its circadian clock, with the blue-light photoreceptor plant cryptochrome likely acting as negative modulator. 

Picture
The Department of Biology at WKU strives to create a dynamic, experiential learning environment, and to be a destination department for competitive undergraduate and graduate students, involving them in the process of science and preparing them for success in a global society. This website is intended solely for use of BIOL 121 students. The information here is copyrighted or within "Fair Use" under the scholarship or education exemption.

  • Home
  • About
  • Unit 1
    • Lab 1
    • Lab 2
    • Lab 3
    • Lab 4
    • Lab 5 ONLINE ONLY
  • Unit 2
    • Lab 6 Part 1 OnLine
    • Lab 6 Part 2
    • Lab 7
    • Lab 8
  • Unit 3
    • Lab 10
    • Lab 11
    • Lab 12 Online
  • Library
  • WKU Blackboard